How to Install Quicklaunch Ultimate Edition
This guide walks you from a fresh install of Windows 10/11 through to having a fully customized Quicklaunch installation.
Please see this FAQ if you are upgrading from version 3 to version 4.
For Quicklaunch installation, see our video on this subject! - Video UCW Installer download and FAQ
Contents:
1. Prepare your PC
- Ensure that you have access to an administrative account on the PC
- Create a service account for Quicklaunch this can be either a local or domain attached account
Note: This account should
- NOT be linked to a Microsoft o365 account
- NOT have administrative privileges
c. Download and configure Microsoft Sysinternals Autologon for the service account
d. Set default browser in Windows (either Edge Chromium or Chrome)
e. Attach and configure all required hardware; Camera, Mic, Speakers, Monitors, HDMI Capture.
f. In the Microsoft Control Panel under Hardware and Sound

Select Sound

i. Navigate to Sound > Playback and disable all unused devices:

ii. set the default device and communication device to speakers being used.

iii. Navigate to Sound > Recording and disable all unused devices:

iv. NOTE: HDMI Capture devices will present a sound device on the Recording tab.
This should NOT be disabled unless you do not want audio capture for your HDMI Capture device
v. Navigate to Sound > Communication and enable the do nothing radio button.

vi. Disable power saving mode for any USB Hubs installed in the hardware configuration by editing
the Power Plan in Windows.
g. Install any required conferencing and/or productivity applications.
h. In the Windows Task Manager > Startup disable any inappropriate autostarts
NOTE: Disable autostart for One Drive, Conferencing Apps.

2. Configure Calendar Room Resource
- Exchange Room resource
i. Create Exchange room resource
ii. For O365 Exchange configure authentication and access via the Microsoft Identity Platform and Graph API.
Quicklaunch supports either O365 or On-Premise versions of Microsoft Exchange.
b. Google Calendar Room resource
3. Install Quicklaunch
2 – Install Quicklaunch
- Configuration Wizard
- Add License Key & Contact Information
- Configure Email and Calendar
- Setup Exchange Account (PE/UE) and Zoom account
- Setup Gmail and Google Calendar Accounts (PE/UE)
- Select Flat or Tabbed Interface
3 - Configuring Displays
- Configure Displays
- Configure Display Modes
- Advanced – Configure Display Rules
4 – Design the Quicklaunch Interface
- Custom Theme and Branding
- Add Action Tiles For Launcher and Collaborate
- Tabbed Mode Themes and Logo
5 - Configure Components
- Configure Camera Application
- Configure AV in Tabbed Mode
- Configure HDMI Sharing
6– System Settings
- General
- Reset Room
- Policies
- Events
- Broadcast
- Network
- Monitors
7- Calendar Views
8- Setting Up MS Teams meeting join in a secure web client
9- Additional Features
- Exchange Extend Meetings: FAQ Link
- Enhanced Screen Saver: FAQ Link
- HDMI Share: FAQ Link
- Join Meeting Constraints: FAQ Link
- Change user: FAQ Link
- Meeting Manager: ZOOM and Skype for Business
- System Check-in: FAQ Link
- Meeting Check-in: FAQ Link
- Action Groups / Embedded Action Tiles: FAQ Link
- Biamp Dialer: FAQ Link
- MS Connect Configuring and Using with Video: FAQ Link
- MS Whiteboard Configuring and Using with Video: FAQ Link
- Themes in Tabbed Mode: FAQ Link
- Using Barco Clickshare with Quicklaunch FAQ
- Using HDMI Share 4 For Wired HDMI Sharing FAQ
- MSI Installer: FAQ Link
- Turn On Automatically Show Touch Keyboard when No Keyboard Attached in Windows 10 FAQ Link
- How to Hide a Group: FAQ Link
- APPS View: FAQ Link
- Display Rules: FAQ Link
- Voice Commands: FAQ Link
- Remote Control: FAQ Link
- Digital Signage: FAQ Link
10 – Save Configuration
- Save All Settings
- Save Template
- Importing
1) How to Prepare your PC
A) Prior to Installing Quicklaunch - PC Account Setup
- In a corporate environment, a “Meeting Room” domain or local account should be set up for the machine.
- IF the meeting room is to be configured in Lockdown Mode there are two options. Either the “Meeting Room" account has local administration rights on the target machine OR Lockdown Manager is installed and configured to support Lockdown Mode with a local User account (this machine MUST be a dedicated Quicklaunch Kiosk - See How to install Quicklaunch to a local User account for more details).
- If Quicklaunch is to be restarted on reboot the Meeting Room account on the target machine will need to be configured to log on automatically and Auto Start will need to be turned on in Quicklaunch System Settings.
- NOTE: In any case where lockdown mode is being used a secondary Administrative account will be required to get out of Lockdown mode if Quicklaunch becomes corrupt for any reason.
Securing a Shared PC in a meeting room is a function of the network, operating system, file system, applications, accounts, group policies, hardware, and physical security. Involving your IT department to address your organizational requirements is essential. Quicklaunch operates in conjunction with these components. Quicklaunch provides the ability to configure a subset of group policies as part of the system configuration as an option at the PC level. However, in a corporate environment, we recommend these settings be managed at the organization unit level.
Lockdown mode hides the windows shell and replaces it with a Quicklaunch shell which prevents access to the start menu, taskbar, task manager, windows keys. It creates scheduled tasks to launch lockdown mode on login and to restart the Quicklaunch application automatically if it is closed.
B) Create Exchange room resource
- An On-Premise, Office 365 or a free Exchange Room Resource account for the Meeting room must be acquired and configured. (Note: Exchange 2013 on-premise or later must be used for full functionality with UE)
- How to Configure Exchange Account
- Tips and Trick for Your Office 365 Exchange Account (details of account setup required including Powershell snippets)
- Setting up Graph API
C) Create a GMail and Google Calendar Accounts
1) Setup Admin User Email Account and Gmail Account for Room Resource
NOTE: A Google room resource is NOT a user and thus when a user clicks meet now or join a hangout, a user is required to login.
2) Add and manage calendar resources https://support.google.com/a/answer/1686462?hl=en&ref_topic=1034362
- Create resources When creating resources, we recommend specific naming conventions to make your resources easy for users to find.
- Manage calendar resources To manage a resource, you need to add the resource's email address to your My Calendars list. You can then use the drop-down menu by the resource to edit, share, or get notifications about the resource
- Share calendar resources If you don't explicitly set the sharing option for your new resource, it will inherit the default sharing option for calendars in your organization
- Add resources to an event Once resources are created and shared, you and your users can add resources to your events much the same way as you invite guests to events
- Get resource notificationsYou can set up to be notified whenever:
- A resource is scheduled on a new event
- A scheduled event is changed or canceled
- Invited people or resources reply to an event
- You can also request a daily schedule for the resource.
Note: After you add a calendar resource, you might have to wait up to 24 hours for it to become available in everyone's calendar
D) Setup PC and Operating System with Peripherals
- Any Peripherals; Cameras, Displays, Microphones to be used with Quicklaunch should be connected to the client computer and drivers installed and configured.
E) Install Collaboration and Other Applications
- All productivity and collaboration software that Quicklaunch will be using should be preinstalled on the target machine.
2) How to Install and Configure Quicklaunch
Note - Once you have purchased a license key or ordered a trial a link to the download will appear in your email
Ensure the download site is not blocked by Firewall, Proxies, etc..
Quicklaunch MUST be installed from the conference room account created above.
Recommended. UCW Installer download link: https://qlinstall.ucworkspace.com/ucwinstaller/prod/0/ FAQ
Quicklaunch standalone MSI Installer and Instructions: https://qlinstall.ucworkspace.com/ FAQ
2a) Setup Wizard: Once installed, Quicklaunch will open with the setup wizard

Select you language
Prerequisites: Ensure to install collaboration applications before running Quicklaunch
Agreement: Read and Accept the License Agreement
Registration: Fill out the registration information. This is tied to your license key.

License: Fill out the License page with information provided in your purchase email. Password Protection (Optional)

Accounts: Select Exchange or Google Calendar type and Zoom

Exchange: Grant app consent or sign with your Google account

Zoom: Login in with your dedicated Zoom account. Quicklaunch will use this credentials to join meetings in the Zoom SDK client.

System: enable automatic start, scheduled reboot, and remote control.

Reset Room: For more info on how to configure Room Reset follow the link - Room Reset

Display: Select Tabbed or Flat interface.

Complete: choose how you wish to start Quicklaunch

3) Configuring Displays
Navigate to Display General Settings tab to configure control buttons, system messages, Lockdown mode shell audio controls and add a room name.

- Select Display, Select - Fullscreen add the display(s) where you want Quicklaunch to run
- Select Docked - Choose what screen Quicklaunch docs on and where it stays in full-screen

Fullscreen
- Screen Id – If you have multiple screens, this setting allows you to choose which screen to display Full Screen View. Quicklaunch™ supports up to three (3) screens.
- Layout – You may choose between two windows modes: Flat and Tabbed
- Behaviour - Dynamic or Fixed
- Calendar Options – Choose to have the Schedule Timeline show either the entire workday (by default 8:00 AM to 5:00 PM) or Meetings Only.
- Room Name Location – This is the same option as Room Name Location on the General tab.
- Show Virtual Keyboard – Allows a choice between Windows, Tablet and Custom keyboard to be used when in Full Screen View.
- Identify Screens – Shows a large unique number on the center of each connected screen, used to identify and target Quicklaunch™ assets for appearing on a specific screen.
Docked
- Dock on Screen – If you have multiple screens, this option chooses which screen to display the Dock View on. Quicklaunch™ supports up to six (6) screens.
- AppBar State – Chooses which side of the screen to display the Dock View on.
- Left Latch – Adjusts the position and style of indicator that appears when Dock View is hidden on the left side of the screen. Selecting the indicator will unhide the dock.
- Right Latch – Adjusts the position and style of indicator that appears when Dock View is hidden on the right side of the screen. Selecting the indicator will unhide the dock.
- AutoHide Time Out – If the Dock View is not pinned to the side of the screen, this is the number of milliseconds before it hides itself. By default, this is 2000ms (2 seconds).
- AutoShow Disable Period – To prevent accidentally revealing the Dock View after it has been hidden, you can set the minimum amount of time it must remain hidden before being allowed to reappear. By default, this is 1000ms (1 second).
- Identify Screens – Shows a large unique number on the center of each connected screen, used to identify and target Quicklaunch™ assets for appearing on a specific screen.
- Optional - Configure Quicklaunch for Console Use
- Link - Configure so that user cannot see the Windows Desktop
Single Screen Configuration
Dual Screen Configuration
World Clock
Add cities and select time zones

Screen Saver
Default and Enhanced screen savers are available in Quicklaunch standalone version. Digital Signage is a separate application and is only available if installed from the UCW installer.

4) HDMI Share
See complete guides for all usage cases of the HDMI Share in this FAG': HDMI Share - Configuration and Usage
Quicklaunch supports a limited number of HDMI capture devices. See the list: Here
- Enable HDMI Share

- Enable screen where you wish to Display HDMI Share window and configure it.

- Enable capture device and configure the visibility.

5) Plugins
Plugins Settings are available for the following UCW applications:

6) Theme
How to Customize and Design Quicklaunch
For more info on customizing the Quicklaunch Flat theme follow the LINK
For more information on customizing the Quicklaunch Tabbed theme follow the Link
Ctrl-Alt-S to enter Settings
- Select Display
- Select Full Screen
- Select Tabbed Mode
- Customize Tabs as Required
- To Configure More than 1 Screen ID Follow The LINK

1) Menu Tabs
Customizable Options
Custom Logo
2) Reset Room
3) Meet Now or
Meeting Timer
4) Camera, Mic, Speaker Controls
5) Keyboard and Touchpad
6) Settings (Optional Password)
7) In Room Monitoring

Add Logo:
Enter Settings Mode Ctrl-Alt-S
1) Select Display Tab
2) Select Fullscreen Tab
3) Select Tabbed
If Adding a Logo
4) Select Show
5) Select Theme
6) Select Header Logo>
Browse for Logo and select

Creating Action Tiles FAQ with video
7) Actions
Action Tiles in Quicklaunch are the buttons hosted by Action groups that start desktop applications, web browser clients, run scripts, and send commands via TCP/IP.
Where can Action Tiles be used? See FAQ
Embedded Action Tiles - Action Group. See FAQ
Action Tiles Display Rules Overview. See FAQ

8) Calendar
To view the calendar options, click or tap on the hamburger icon in the top left corner of the meeting tile
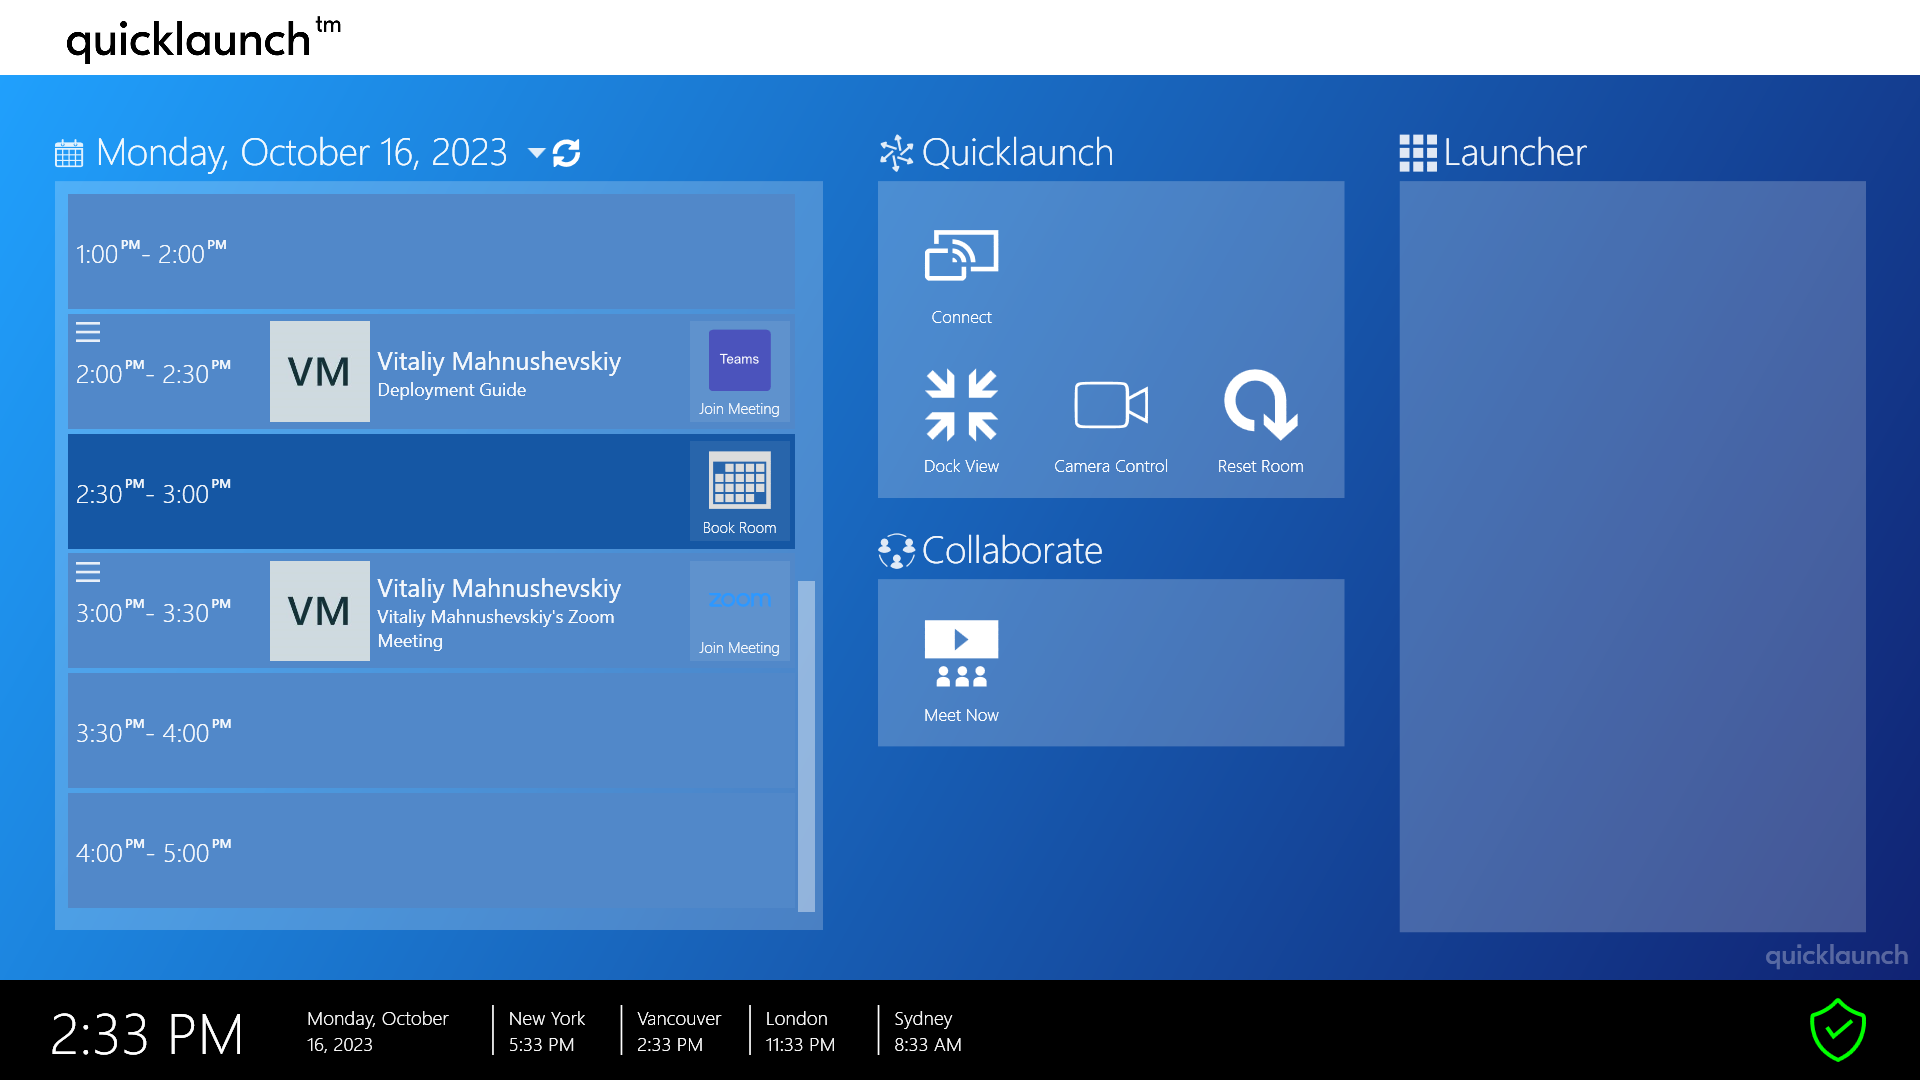
Calendar options: Here you can send an invite to a participant, view the details of the meeting and send a group email to all the participants.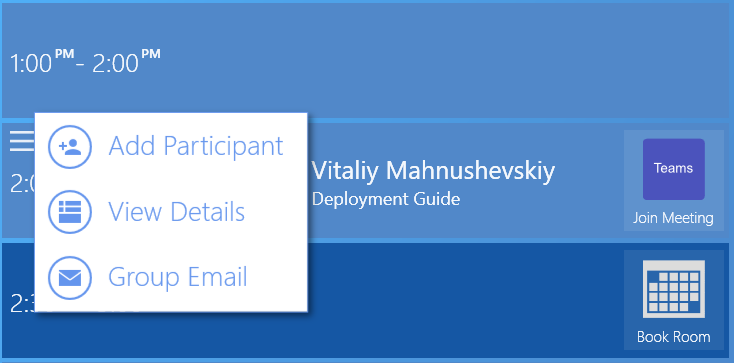
Add Participant: 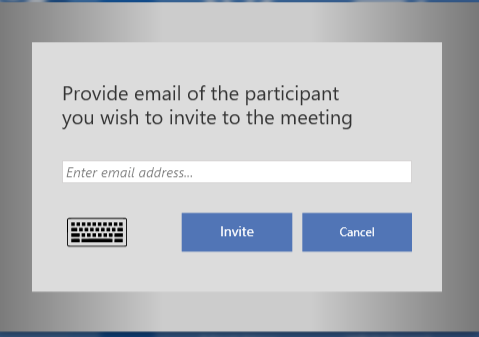
View Details:
Group Email
Calendar General Settings

Meeting Providers Settings

Other Calendar features and settings:
Meet Now for Zoom. See FAQ
Meeting End Notifications. See FAQ
How to Configure and Use Zoom Meeting Manager. See FAQ
Meeting Check-In. See FAQ
9) Reporting
Quicklaunch can send reports about Meeting check-in and System Check-in activities.

10) System Settings
General Settings

Reset Room: For More Information follow the LINK

Policies: For More Information follow the LINK

Events: For More Information follow the LINK

Broadcast: This is to add a message to your Quicklaunch main screen title bar

Network: For More Information follow the LINK

System Monitors: 
Options: Extra options are shown in the Settings tab > Far-right
11) Configuring Components
Configure Camera Application (Requires Supported Camera)
- Click on the Camera Action Tile
- Click on the 'Gear Icon'
- Choose the Supported Camera from the Device List
- Select Close

Configure AV Settings
In the Tabbed Interface Select the AV Tab from the Right Panel
- Choose the Camera from the Drop Down Menu (requires Supported Camera)
- Choose Speakers from the Drop Down Menu
- Choose Microphone from the Drop Down Menu

Configure HDMI Share
Configure Plugins Settings
Configure Wireless Sharing
12) How to setup different Conferencing Providers
For more information on MS Teams setup follow theinstructions in this FAQ
13) Setting Up Additional Features
- Exchange Extend Meetings: FAQ Link
- Enhanced Screen Saver: FAQ Link
- Join Meeting Constraints: FAQ Link
- Website Action Tile Enhanced Experience and Secure Browser - FAQ Link
- Microsoft Teams Setup Guide FAQ Link
- Change user: FAQ Link
- Meeting Manager: ZOOM and Skype for Business
- System Check-in: FAQ Link
- Meeting Check-in:FAQ Link
- Action Groups / Embedded Action Tiles: FAQ Link
- Biamp Dialer: FAQ Link
- Microsoft Whiteboard: FAQ Link
- MS Connect Configuring and Using with Video: FAQ Link
- MS Whiteboard Configuring and Using with Video: FAQ Link
- Themes in Tabbed Mode: FAQ Link
- Using Barco Clickshare with QuicklaunchFAQ
- Using HDMI Share 4 For Wired HDMI Sharing FAQ
- MSI Installer: FAQ Link
- Turn On Automatically Show Touch Keyboard when No Keyboard Attached in Windows 10FAQ Link
- How to Hide a Group FAQ Link
- APPS View: FAQ Link
- Room Reset - Reset meeting timer and end meeting FAQ Link
14) How to Import/Export Template:
For more information on Importing/Exporting follow the Link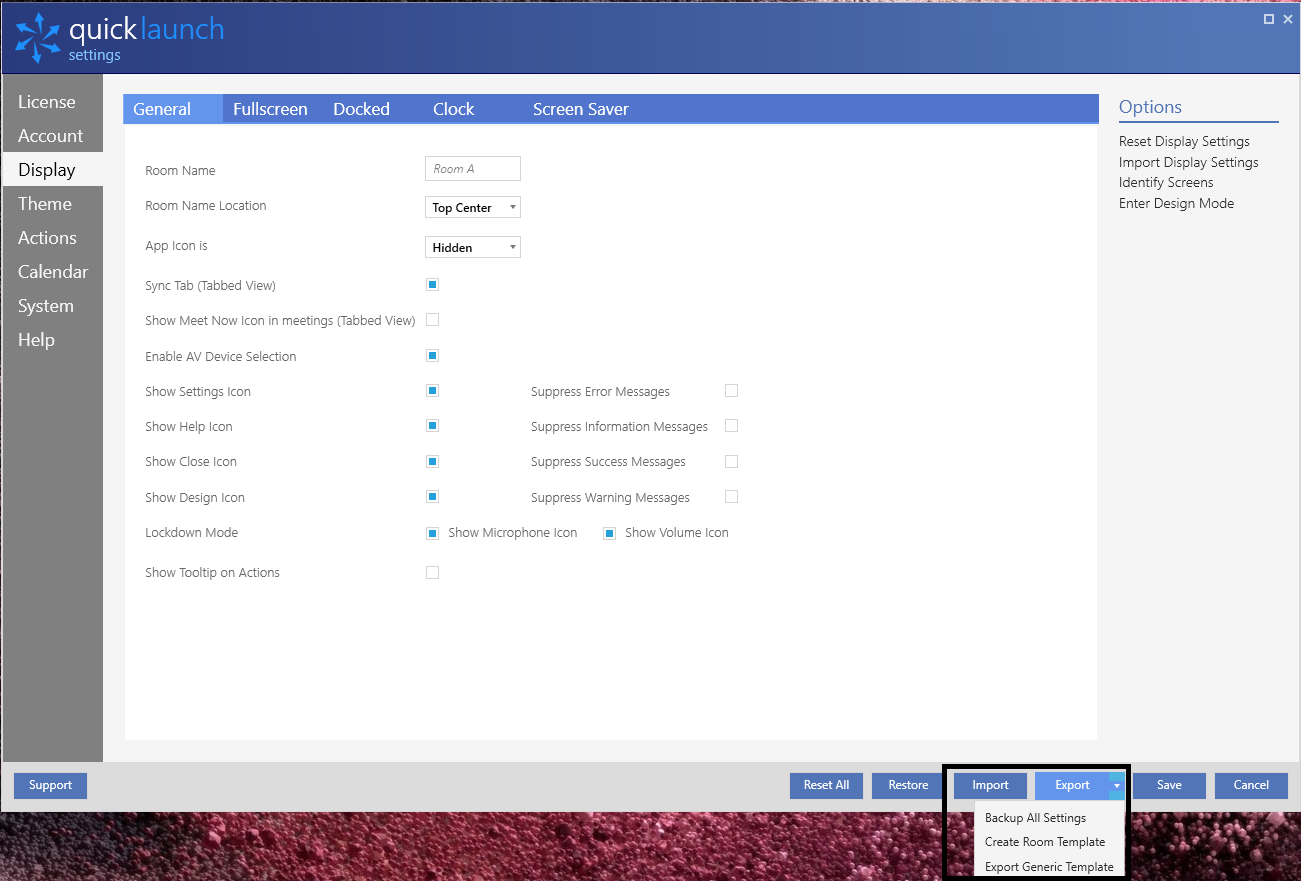
Create a Template:
Select Export (bottom right corner)
Backup all settings: Will export as a QLS file
Create Room Template: Will export as a QLT file
Export Generic Template: Will export as a QLT file
To import select the Import button
File Explorer will open

Choose the file you would like to import